
My advice as a brand and strategy consultant is simple: build one small AI workflow, track one number, and launch it within a week. That’s the fastest path for a first app that people will use.
I’d keep the plan this simple:
- Pick one job the app will do
- Set one main metric and one backup metric
- Use a small stack like ChatGPT + Glide or Bubble + Airtable + Zapier/Make
- Build one input, one AI step, and one output
- Run a 4-week pilot
- Review human edits every 2 to 3 days
The article’s examples make the point clear. One coach got 40% more leads with a chatbot focused on booking. One practice cut scheduling work from 8 hours to 2 hours per week and reduced no-shows by 90%. That happened because the scope stayed tight.
If I were starting today, I would skip the “all-in-one assistant” idea. I’d write the workflow in four parts - trigger, inputs, logic, output - then build the smallest version that can do that job from start to finish.
Here’s the short version: keep the app narrow, keep the tool stack small, keep the screen plain, and let pilot data tell you what to fix.
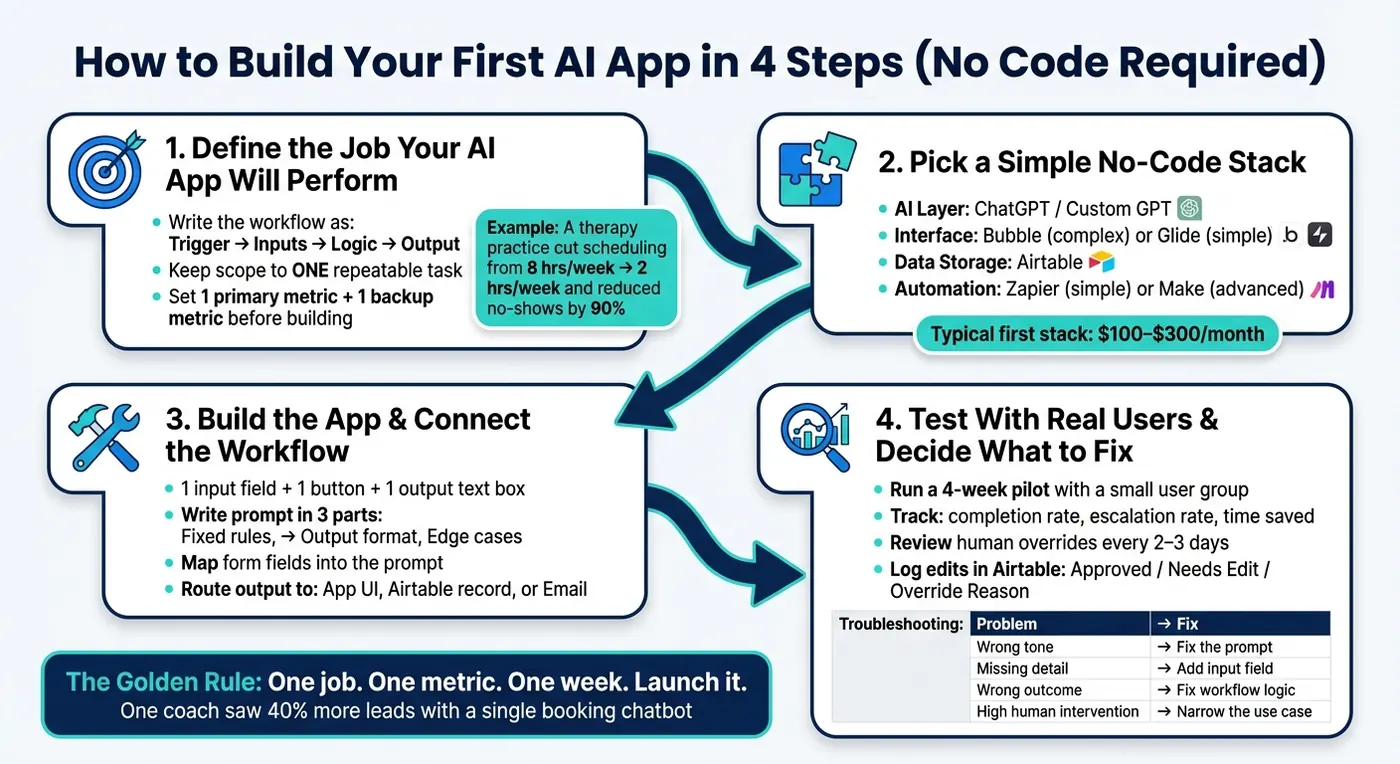
I Built a Real AI App in 60 Minutes (No Coding)
Step 1: Define the job your AI app will perform
Start by turning your workflow into a simple four-part blueprint.
Write the workflow as trigger, inputs, logic, and output
Every AI workflow has four parts: what starts it, what information it gets, what the AI does with that information, and what it sends back. Write each part in one sentence before you open any tool.
| Blueprint Component | Lead Scoring Example | Support Bot Example |
|---|---|---|
| Trigger | New lead submits a contact form | Customer sends an inbound email |
| Inputs | Name, company size, budget, service interest | Email subject, message body, customer tier |
| Decision Rule | Score lead if budget > $5,000 and company size > 50 employees | Match question to FAQ; escalate if no match is found |
| Output | Notify sales via Slack with a "High Priority" or "Low Priority" tag | Send a reply email with the answer or a handoff message |
This blueprint spells out exactly what the app needs to do. No guesswork. No fuzzy “smart assistant” language. Just a clear job.
Keep the scope small enough to build in one week
A one-week build works best when it handles one repeatable task, not a giant all-purpose assistant.
For example, a lead qualification app should score inbound leads and suggest the next step. It should not try to run your whole sales process. In the same way, a proposal generator should draft one document type from a form, not tackle every related workflow at once.
The sweet spot is a task with a strong mix of impact, frequency, and simplicity.
"Your first version should do one thing exceptionally well. Avoid the temptation to add multiple features; each addition increases complexity and delay." - Al Mahbub Khan, Full-Stack Developer
Pick one primary metric and one backup metric
Choose one primary metric and one backup metric before you write a single prompt. This keeps you honest. If the app works, the numbers should show it.
Pick the metric that lines up directly with the workflow. For a scheduling workflow, that could be hours of admin time saved each week.
In November 2025, a therapy practice owner named Maria automated her appointment scheduling workflow, which had previously taken 8 hours of administrative time per week. After setup, scheduling time dropped to 2 hours per week, and the practice eliminated 90% of patient no-shows. That kind of simple tracking makes it easy to see if the app is doing its job or needs work.
With the job and metrics pinned down, the next step is choosing the no-code tools that fit each part.
Step 2: Pick a simple no-code stack for your MVP
Break the workflow into four parts: the AI layer, the interface, automation, and data storage. Then match one tool to each part of the trigger-input-output flow. The goal is simple: use as few tools as possible to get your MVP live.
Use ChatGPT or GPTs for the AI layer
Use a custom GPT for internal tools that answer questions, draft emails, score leads, or summarize notes based on your instructions and files.
If you're building a public app or need more complex rules, connect an AI API through Bubble or Glide. Here's the simple rule of thumb: use a custom GPT when speed matters most, and use a connected app when you want more control.
If users need to enter their own data, the next piece to set up is the interface.
Use Bubble or Glide for the interface and Airtable for data
Use Bubble for apps with more moving parts. Use Glide when you want a simpler internal tool and want to move fast.
For storage, Airtable is a solid place to start. It can act as your first database for users, prompts, and outputs. That means you don't need to overcomplicate things on day one.
Use Zapier or Make to move data between tools
When a user submits a form, Zapier or Make can send that data to the AI, then write the result back to Airtable or your app. You don't need to write code for this. You build the workflow visually.
A simple setup often looks like this:
- A user submits a form
- Zapier or Make sends the data to the AI
- The AI returns an output
- The result is stored in Airtable or shown in the app
Start with Zapier. Move to Make if you need multi-step flows or branching logic. Either way, a typical first stack costs between $100 and $300 per month in total.
Once you've picked the stack, build the smallest screen possible to collect input and send it through the workflow.
Step 3: Build the app and connect the workflow
Now it’s time to turn the workflow from Step 1 into something people can use. Keep it small. You’re building the first working version, not the whole product.
Use the stack you picked and create the simplest path possible: one input, one AI call, and one output.
Build a minimal input and output screen
Start with a plain screen:
- One input field
- One button
- One text box for the result
That’s it. Only include the fields the AI needs to do the job well. Skip navigation menus, user profiles, and extra features for now. They can wait.
Also, add a loading spinner. AI replies usually take a few seconds, and without a clear loading state, the app can feel broken.
After that, connect the input fields to the prompt so the AI gets the right context.
Write the prompt and map form fields into the prompt
Write the prompt in three parts:
- Fixed rules
- Output format
- What to do when inputs are incomplete or off-topic
Use plain English. Don’t overthink it. The goal is to make the instructions clear so the model knows what it should do every time.
Then map your form fields straight into the prompt. Based on the workflow from Step 1, the trigger runs when a user submits the form, the inputs drop into the prompt where the AI needs them, the logic runs on those values, and the output comes back in a structured format.
In Bubble, the API Connector lets you place these fields into the request body. In Glide, Zapier or Make picks up the new row and passes the field values into the AI step automatically. Keep the mapping the same each time so one field always feeds the same variable.
Once the prompt is mapped, send the output back to the user or your data table.
Send the result back to the app, table, or email
When the AI sends back a response, route it to one of three places: the app UI, an Airtable record, or an email.
In Bubble, run the workflow on button click, call the AI, then show the result in the text box. In Glide, the result shows up in the app when Zapier or Make writes it to the Airtable Result column.
Step 4: Test with real users and decide what to fix next
Once the workflow is live, don't rush to pile on new features. Right now, your only job is to see whether the app does the thing you built it to do. This stage is about validation, not expansion.
Run a small pilot over a fixed time window
Run a 4-week pilot with a small group of users. Start with close monitoring, then slowly step back as the workflow settles in. By Week 4, the app should be able to handle the workflow with little human oversight.
Give users one clear task that lines up with the app's purpose. That could be:
- booking an appointment
- asking about pricing
- submitting a support ticket
Measure the same outcome you defined before building. Stick with the primary metric you chose in Step 1 to judge the pilot, and track 2–3 supporting metrics tied to the app's job, like completion rate, escalation rate, and time saved.
Add review fields and tighten the prompt
Add a few simple review columns to your Airtable table: Approved, Needs Edit, and Override Reason. Each time a person changes or rejects an AI output, record why. Log every human override in Airtable, then review those logs every 2 to 3 days so you can spot patterns and update the instructions or knowledge base.
When something goes wrong, fix the source instead of patching the symptom.
| What you're seeing | Where to fix it |
|---|---|
| AI uses wrong tone or misunderstands the request | Tighten the prompt |
| AI lacks a key detail to make the right call | Add or clarify an input field |
| AI follows instructions but the business outcome is wrong | Fix the workflow logic |
| Human intervention stays high | Narrow the use case further |
Let the pilot tell you what needs work. Sometimes the issue is the prompt. Sometimes it's the inputs. Sometimes the workflow itself is the problem.
Conclusion: Ship the smallest useful AI app first
Ship the smallest useful version first. Then use what you learn in the pilot to refine the prompt, inputs, or workflow.
FAQs
How do I choose the best first AI app idea?
Start with a real, painful problem, not a feature-packed idea. The best place to look is work that's repetitive, rule-based, time-consuming, and low-risk to automate.
A simple way to test an idea is this: "I waste time on [task], and my app will fix it."
Then score each idea based on:
- Impact
- Frequency
- Simplicity
Pick the narrow use case with the highest score. That makes it easier to validate your MVP fast and avoid building too much too soon.
What if my AI app gives wrong or inconsistent answers?
If your AI app gives wrong or inconsistent answers, start with testing and refinement.
First, figure out whether the errors are random or systematic. Random mistakes can be harder to pin down. But systematic issues usually point to a clear source: your prompt or instructions likely need work.
Another way to improve accuracy is to ground the AI in your own files or a specific knowledge base. That gives the model a tighter set of facts to work from instead of letting it guess.
You should also review AI-generated content by hand. No matter how good the system looks, a human check still matters.
Then use what you learn to update the app:
- Look at user feedback
- Test edge cases
- Watch for repeated failure patterns
That process helps you spot weak points and tighten the output over time.
When should I add more features to my MVP?
Add more features only after you launch your MVP and hear from real users. At the start, the goal is simple: make the first version do one thing very well.
If you pile on extras too soon, things get messy fast. More features mean more complexity, more ways for things to break, and more time spent building stuff people may not even want.
Once you start getting traction, let user feedback and usage data guide your next moves. That way, you're not guessing. You're improving the product based on what people actually use and care about.