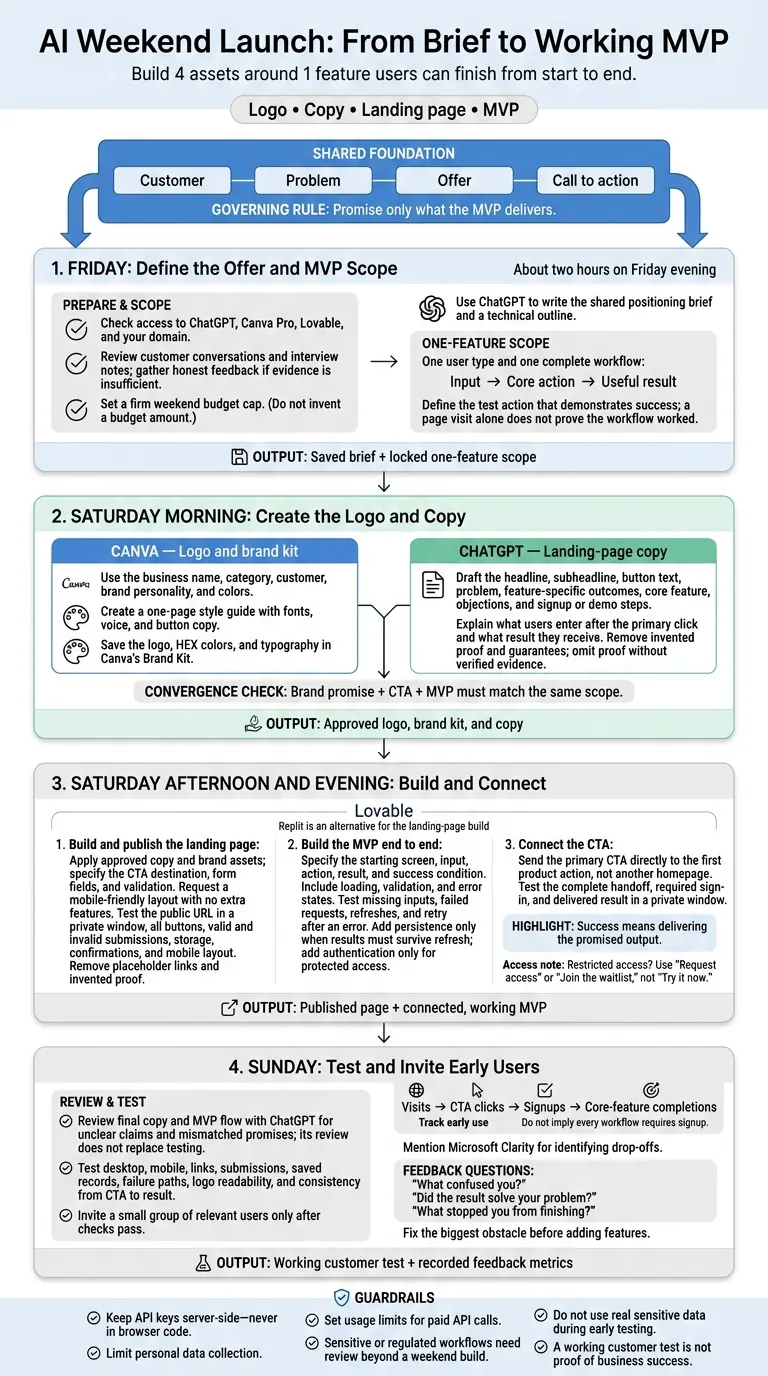
My weekend launch plan: build 4 assets around 1 feature users can finish from start to end. I use ChatGPT for copy, Canva for the logo, and Lovable for the landing page and MVP - all guided by the same customer, problem, offer, and call to action.
- Friday: Check customer feedback, set a budget, and define one workflow with a clear result.
- Saturday: Create the logo and copy, build the page and MVP, and connect the CTA to the first product step.
- Sunday: Test desktop, mobile, and error paths. Then invite a small group to try it and track clicks, signups, and completed workflows.
My rule: <u>promise only what the MVP delivers</u>. I keep API keys server-side, limit data collection, and fix blockers before adding features. The goal is a working customer test - not proof that the business will succeed.
Create an App in 12 Minutes | Lovable for Beginners
Friday: Define the Offer and MVP Scope
Set aside about two hours on Friday evening to plan. Before you begin, check that you can access ChatGPT, Canva Pro, Lovable, and your domain. Set a firm weekend budget cap to keep extra tools and features off the shopping list.
Confirm the Customer Problem
Review customer conversations and interview notes to choose the problem your MVP will address. If you don’t have enough evidence, gather honest feedback with a simple landing page or unfinished prototype. Don’t call that validation before you have it.
Write a Shared Positioning Brief
Ask ChatGPT to turn your notes into a one-page positioning brief covering the customer, problem, offer, and call to action. Use that same brief to guide the copy, logo, landing page, and MVP instructions so each piece sends the same message.
Limit the MVP to 1 Core Feature
Choose one user type and one complete workflow: an input, a core action, and a useful result. Define the test action that shows the workflow worked. A page visit alone doesn’t prove it.
Ask ChatGPT for a technical outline first. Then give Lovable the same scope to keep the build focused and usable.
Stick to one workflow, only the screens needed to finish it, and the infrastructure needed to support it. Schedule the logo and landing-page copy for Saturday morning, after the scope is locked.
Saturday Morning: Create the Logo and Copy
Create a Logo and Brand Kit in Canva
Give Canva your business name, category, customer, brand personality, and colors. Use the positioning brief to generate a one-page style guide with fonts, voice, and button copy. Save the logo, HEX colors, and typography in Canva’s Brand Kit.
Match the logo to your audience and the promise in the brief. Keep it simple and easy to read, both on the page and inside the product.
With the visuals set, use the same brief to draft the page copy.
Write and Review Landing-Page Copy with ChatGPT
Give ChatGPT the positioning brief and the page’s goal. Ask for separate sections covering the headline, subheadline, button text, problem, feature-specific outcomes, core feature, objections, and signup or demo steps.
Spell out what happens after the primary click: what users need to enter and what result they’ll receive. Tie every section to the one workflow your MVP supports.
Check each promise against what the MVP can deliver. Remove invented proof and guarantees. If you don’t have verified evidence, skip the proof section entirely. Then check that the landing page’s promise still matches your one-feature MVP.
Match the Brand and Copy to the MVP
Before building, check that the brand promise, CTA, and MVP match Friday’s one-core-feature scope. Use the style guide to set the voice, colors, fonts, and a single CTA. Repeat that CTA everywhere, and fix any mismatch before you build.
| Asset | Must align with | Check before approval |
|---|---|---|
| Logo | Brand personality | Does it match the audience and tone? |
| Headline | Customer problem and outcome | Does the MVP deliver the promised result? |
| Benefits | Customer value | Does each benefit map to a real MVP function? |
| MVP description | One core feature | Does the copy name the input, action, and result? |
| CTA | Next measurable step | Does the CTA name the action and match the next step? |
Saturday Afternoon and Evening: Build the Page and MVP
Build and Publish the Landing Page
Give Lovable or Replit a single build brief with your approved positioning, copy, and Canva brand assets. Specify the customer, offer, colors, fonts, logo placement, CTA destination, form fields, and basic validation rules. Request a mobile-friendly layout with no extra features. The page should sell the same single outcome your MVP delivers.
Publish the page and open its public URL in a private window. Test every button and submit the form with both valid and invalid entries. Confirm that valid submissions reach storage and display a clear confirmation. On mobile, check for clipped text and horizontal scrolling. Remove placeholder links and invented proof before sharing the URL. Then build the product flow around that same promise.
Build the MVP Workflow from Start to Finish
Once the page works, build only the workflow needed to fulfill its CTA. Give the builder a spec covering the starting screen, input, action, result, and success condition. Success means delivering the promised output, not just displaying a results screen.
Include loading, validation, and error states. Set clear rules for failed requests, saved data, and features you’re leaving out.
Add persistence only when results must survive a refresh. Add authentication only when users need protected access. Keep API keys in server-side secrets - never in browser code. Handle user data and feature access through the backend, and set usage limits for paid API calls to reduce abuse.
Test missing inputs, a failed request, a refresh, and a second attempt after an error. Sensitive or regulated workflows need review beyond a weekend build. Don’t use real sensitive data during early testing.
Connect the Landing Page to the MVP
Send the primary CTA directly to the first product action, not another homepage. Match the landing page’s CTA and promised outcome on the first product screen.
When access is restricted, use “Request access” or “Join the waitlist,” not “Try it now,”. Test the full handoff from the published page in a private window, including any required sign-in and the end-to-end result.
Sunday: Test the Launch and Invite Early Users
Run the Final Launch Checks
With the page and MVP live, use Sunday to catch any remaining gaps before users arrive. Every promise should match the single workflow your MVP delivers.
Give ChatGPT your final copy and MVP flow. Ask it to spot unclear claims and mismatched promises from a skeptical customer’s perspective. Treat its feedback as a review - not a replacement for testing.
Then test the full flow yourself on desktop and mobile. Check links, form submissions, saved records, and failure paths. Make sure the logo is readable on mobile and the experience stays consistent from the CTA to the delivered result.
Track Early Use and Collect Feedback
Once the checks pass, share the link with a small group of relevant users from your newsletter, LinkedIn, or a niche community. Watch for steps where they get stuck.
Track visits, CTA clicks, signups, and core-feature completions. Do users reach the one result your landing page promised? Use Microsoft Clarity to see where they drop off. Collect only the personal data needed for access or delivery.
Ask:
“What confused you?” “Did the result solve your problem?” “What stopped you from finishing?”
Use the drop-off data to fix the biggest obstacle first. That might be the CTA or a confusing step. Address it before adding features.
Conclusion: Complete the Weekend Launch Checklist
Before closing the weekend’s live test, confirm that your positioning brief is saved, logo and brand kit are exported, copy is reviewed, and page is published. Check that the CTA has been tested, the MVP works, promises match what it delivers, and feedback metrics are recorded.
FAQs
Can I build an AI-powered MVP without coding skills?
Yes, you can build a working, AI-powered MVP without coding skills. No-code tools turn plain-English prompts into full-stack web apps with databases, user authentication, and payment integrations.
Lovable helps non-technical founders build and deploy an MVP in a single weekend. The key is to write clear, structured prompts that spell out your user problem, brand voice, and core features. Those instructions can turn into a live, usable product - without writing code.
How much should I budget for a weekend launch?
Budget $100 to $400 for the tools and initial testing you’ll need. That includes entry-level paid plans for Lovable or Replit, typically $20 to $25 per month, plus $50 to $200 in ads to send targeted traffic to your landing page and test demand.
Keep your tool stack lean and focus on one core feature. This helps you avoid extra subscriptions while collecting meaningful data on your value proposition.
How do I know if my MVP is worth pursuing?
Validate demand through behavior, not compliments. Define your buyer and the painful problem they face. Set pass/fail rules before you build, then test a landing page with 100–200 visitors. Look for strong signals: 5%+ email signups and 25%+ conversion on your main call to action.
Next, ask for money or a clear commitment through pre-sales, deposits, or paid pilots. Proceed with 3–5 pre-sales or paid-deposit conversion above about 1.5%. If you don’t meet either threshold, pivot or stop.